Monday, December 15, 2014

Zbrush - Final (Creature Sculpt)

The final assignment for class was to choose a subject that you could take to a highly polished state. I've been itching to do some creature sculpting, so I knew exactly what I wanted to do for the final. During this semester I have also been bulking up on tutorials and learning resources that I wanted to utilize for this project. One of my favorite artists, Kurt Papstein, released an in depth series of tutorials covering creature sculpting. You can find them and other awesome ones here!

Reference 01:


As always I start my design process by gathering and putting together as much useful reference material as I can. I knew for the creature that I wanted it to have some insect-like features. However, I really wanted to challenge myself so I looked at crustaceans, reptiles, and some bovine-esque mammals. 

 Reference 02:


I eventually found that I was focusing too much on insects and started more of the previously mentioned animals. For me it's the subtle details, like the way the animals carapace forms and the overall forms that get my creative juices going. I found that there were a lot of interesting color choices to make as well. 

Reference 03:


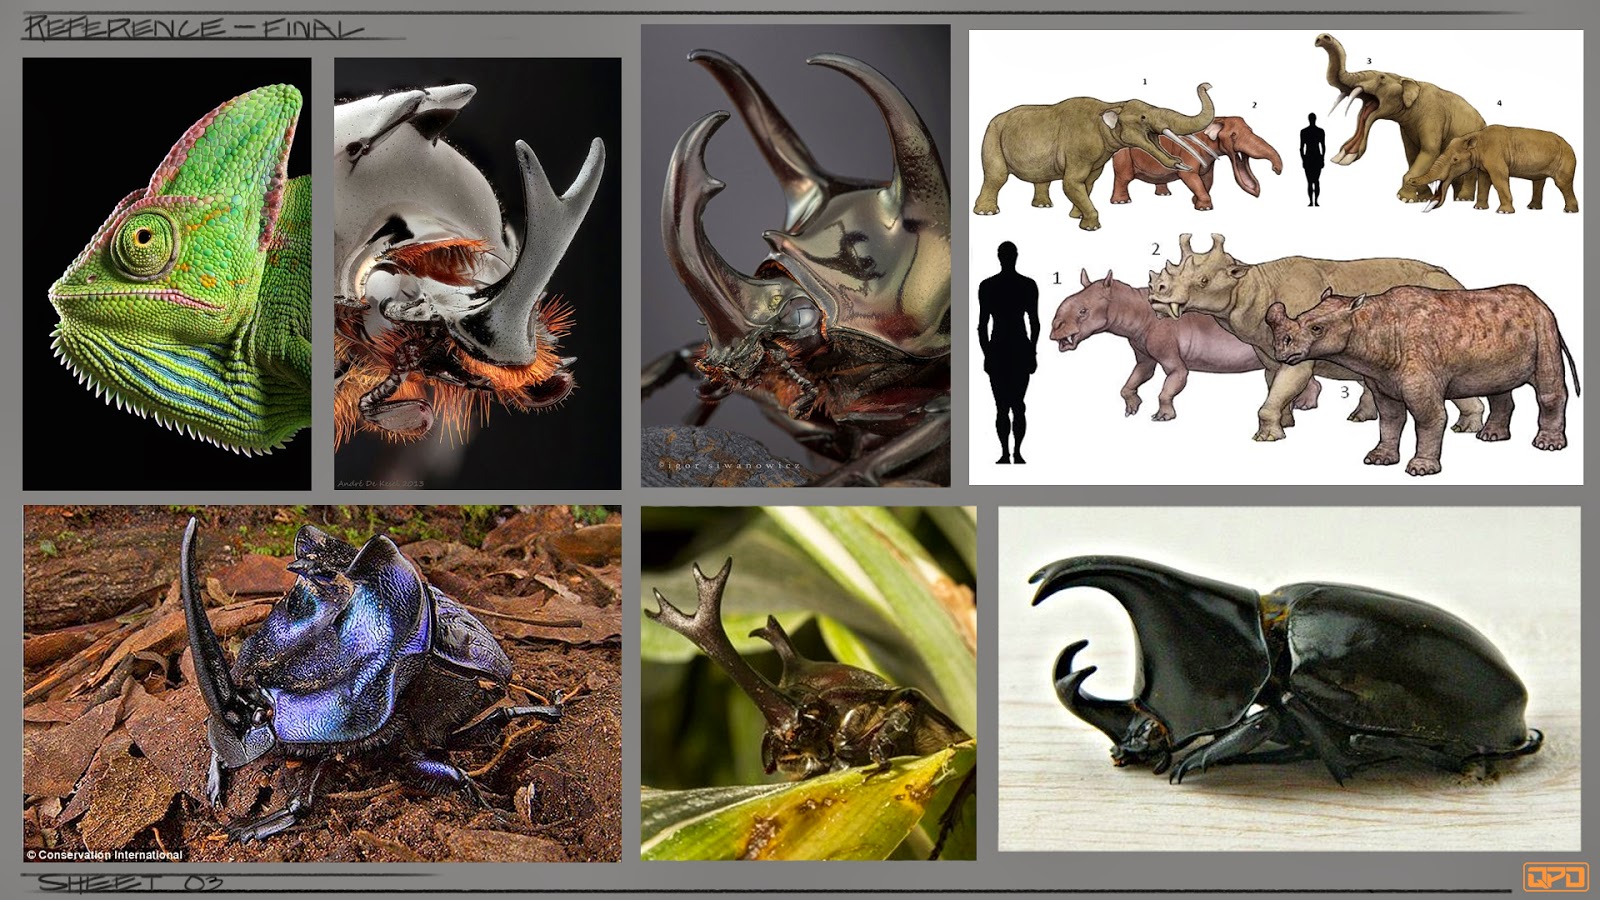
I feel like this final reference board really summarizes the sculpt overall. As you'll see in the final sculpt, these three types of animals were my biggest influences. 

Final Beauty Render:


The final render came out excitingly well! Previously, I was only experimenting when it came to my post sculpting process. However, after going through Kurt's tutorials I discovered some of zbrush's most exciting features. The sculpt process was the most fun I've had in a long time. Kurt shows you how to work from a dynamesh and just find "the flow" of the sculpt before you focus on the specifics of anatomy. After I finished sculpting in the details I moved on to polypainting. Up to this point polypainting has been a technical nightmare, yet Kurt breaks it down in a simple and flexible way that makes the process so much more natural. He then shows you how to utilize lightcaps, which really push how your details as well as colors read on your sculpt. He finally goes over the final tweaks such as BPR filter and some fancy photoshop tricks.

Render Presentation Sheet:


Here you can see both the polypainted and base material versions of the sculpt. Overall, this final was a huge confidence boost for myself because I felt like I was really understanding zbrush. Not only did I overcome my fear of polypainting and lighting, but I also polished this sculpt to the highest fidelity. Before this, I felt like the assignments were more of "sketches," which left me yearning for an opportunity to go all out. Now that I have, I can't wait to really push my ideas and produce an entire body of work incorporating zbrush as one of the main tools in my designer arsenal. 


Tuesday, November 25, 2014

Zbrush - Portrait Study


This week's assignment was to choose a celebrity and create a portrait study. I chose to sculpt Regi Watts. Early in class I noticed that everyone was choosing bald white guys (since they're purely sculpting) so I chose to take a completely opposite approach by picking the hairball you see below. I started the mesh by sculpting out his basic features/proportions while also keeping in mind that he would be 80% hair.


 Reference Images:
I really enjoyed the sculpting part of this assignment. Between getting the nose just right and cutting in those wrinkles, it was the least troublesome for me. Fibermesh, initially, presented itself as a difficulty. But 3 fibermesh subtools later and I was getting the hang of it. However, I still want to get better control of the "groom" brushes.

My biggest issue with this assignment was spotlight. I just couldn't get the textures the quality that I desired. I spent at least a third of the assignment finagling and researching additional tutorials to help me in any way possible. It wasn't until class that I realized that it was my texture image resolution that was the issue. For the next version of this guy I plan on re-spotlighting and painting over in zbrush to get the texture just right.

Render Sheet (WIP):


Tuesday, November 11, 2014

Zbrush Hand Study

This week our assignment was another anatomy study with the choices either being a hand or foot study. I chose to do a hand for several reason. One, I'm awful at drawing these guys and I knew that if I was to successfully pull this off in 3D I would need to really analyze this deeper than I had before. Two, it would be a lot easier to pair up a hand to my previous arm sculpt than a foot haha. Below are some of the references I collected, which included medical illustrations, gesture/construction drawings, and 3D renders.

Reference:

Once again, I cannot express how important the sketching phase is for me when it comes to working in 3D. After doing a fair share of research I found some really informative ways to go about creating hands. My biggest take aways were:

1.) Locate major forms. Don't be afraid to simplify shapes!
2.) The hand is composed of wave-like gestures. Prevent stiffness by having fingers curving.
3.) Identify major angles. Ex: The thumb and pinky (when spread) intersect to form a 90 degree angle.

Pre-Sketches/Exploration:


Overall, the assignment was very similar to the arm study, except with its own sets of challenges. The biggest frustration for me was maintaining the finger tip shapes, while also giving them a more natural shape. This assignment really made me realize how powerful the standard brush is. I would say about 90% of the sculpt was just done with that alone. I also was able to focus on to really dig in there and carve out some details.

Final Presentation Sheet:


Tuesday, October 28, 2014

Zbrush - Arm Study

 This week's assignment was pretty straightforward, arm anatomy study. I first looked up quite a bit of reference material which included, photos, construction drawings, and 3D sculpt renders. Then before jumping into Zbrush I went through about 20-30 minutes of pre sketching. For me, this is the most important phase of design. It bridges the gap between looking at reference and jumping into software. The biggest challenge I tackled was to simplify the forms and really understand the overlapping shapes/insertion points.

Reference:


Here are the final renders! I had a lot fun with this actually. In prior assignments I tend to get frustrated whenever I step away from the modeling phase, so to be able to just go nuts with sculpting was a blast. 

Final Presentation Sheet:


Tuesday, October 21, 2014

Zbrush - Rhino Assignment

The final render with a splash of color and texture. I was trying to polypaint him, but just couldn't get the colors I wanted.


Tuesday, October 14, 2014

Zbrush - Bonsai Tree

For this week's assignment we were instructed to do an "architectural" asset. This didn't technically have to be a piece of architecture, so I decided to do a bonsai tree.

Fun Stuff:

As usual, I really really enjoyed the sculpting phase of this assignment. It was also my first time using zpheres, which was a blast. They're not only a great way to dive in, but also they're pretty easy to get the hang of.  This project was the first time I took advantage of subtools as well, which kept workflow quite a bit more organized.

Problems/Challenges:

Fibermesh. I spent the most time fussing over this. What's so frustrating about this tool is how much control they give you. The results can be amazing, but for newbies like myself it's a headache and a half. After struggling with it for several hours I eventually got the model to the point where I could let photoshop tighten up the loose ends. But like polypainting, I still want to get a grasp of fibermesh for future sculpts.

Reference:


Final Pres Sheet:


I definitely plan on coming back to this guy and incorporating some more smaller details to really set it off. From what I saw from the many tutorials on fibermesh, its a worthwhile tool that I want work with again. I learned a lot during this assignment and found that the only frustrations I had was because I was trying to incorporate too many technical tricks. I think for my best results I need to hold back on what I choose to learn about. I'm still getting accustomed to the software and diving too deep into the technical side of it tends to leave me with unhappy results. 

Rhino Assignment WIP

Last week's assignment was a to modify a rhino sculpt and I chose to do an Eobasileus study. I was super excited to jump in with this. The initial sculpting was definitely the most fun. I really enjoyed using just a few brushes to get the general forms nailed down.

Now for the problems. I was working with my sculpt not realizing how important it would be to keep my lower subdivisions. As I got to my transposing phase, I could no longer move my mesh around without experiencing severe lag. This led to several headaches late into the game. However, I pushed ahead.

The other big issue I had was of course my arch-nemesis, polypaint. I work primarily as a concept artist so when I don't have the kind of control that I have in photoshop, I tend to get a little cranky. Regardless of my initial dissent, I did dive into polypaint. Currently that is my last step for polishing up my rhino.

Reference Images:


WIP File:


I still have some more work ahead of me for this guy. I definitely want to go in and sculpt some more skin details. As of now Im trying to get the polypaint to work nicely. Once I nail that the updated textures will follow.